Table of Contents
- Base Installation
- Prerequisites
- Installation of Keycloak
- Configuration of Keycloak
- The Master realm
- The Olvid users realm
- The Olvid admin realm
- Configuration of the Olvid Plugin
- Upgrading
- Additional Configuration
- Configuration of an External IdP
- Using LDAP User Federation
- x509 Client Certificates Authentication
- Configure Olvid via an MDM
- Using the management console
- Use the Olvid Management Console
- Misc.
- Changelog
Create an Olvid user realm
1. Create the olvid realm
A Keycloak realm corresponds to a set of users. The master realm is used for the administration of the Keycloak server and will not be used for Olvid users. We are going to create a dedicated olvid realm for the Olvid users.
-
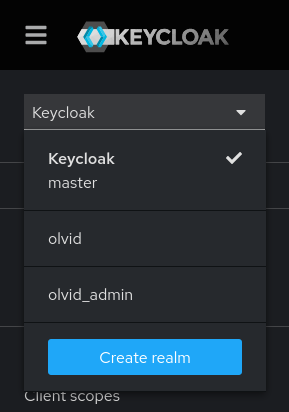
Open the Manage realms page on the left and press Create realm at the top.
-
for the Realm name enter “olvid”, or any other name that helps you tell this realm appart from the
masterandolvid_adminrealms. Avoid spaces or special/accented characters as this realm name will be included in URLs.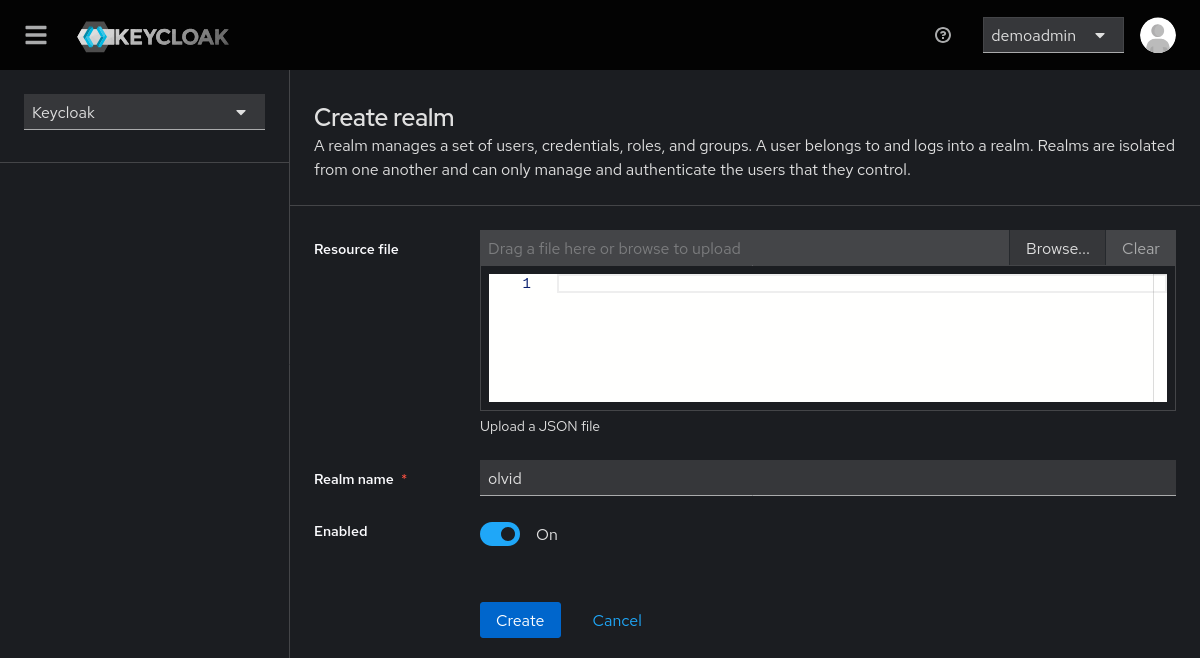
-
press Create and wait a few seconds for the realm to be created.
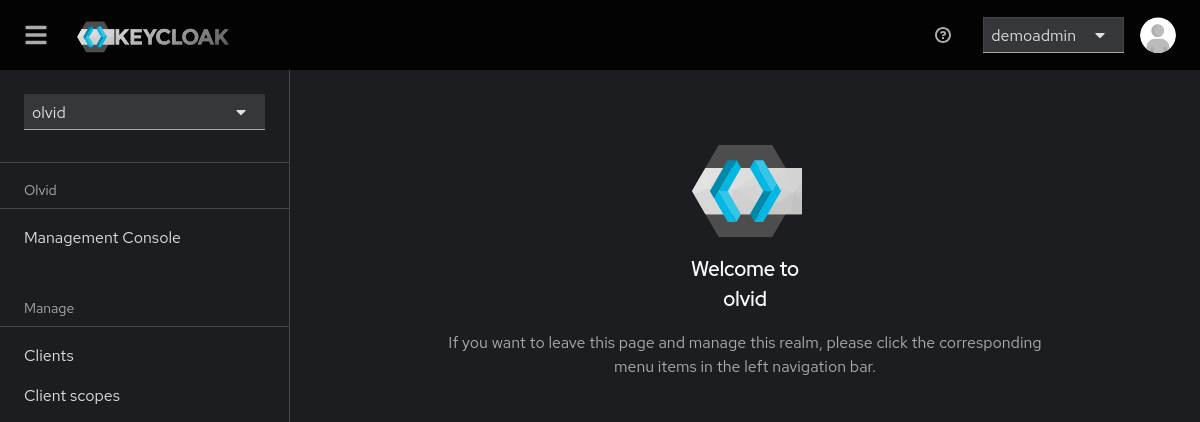
The realm must now be configured to choose which users can connect and how users authenticate with this realm. We explain how to configure an external Identity Provider in another page of this guide, but for now we will configure Keycloak with local users. Even if you plan on using such an IdP, it is preferable to first test everything is functional with a local test user.
2. Configure the signature keys for this realm
By default, a newly created realm uses an RSA2048 key, which is a little “light” from a security standpoint. We recommend using elliptic curve keys.
-
Open the Realm Settings page from the left menu (make sure the
olvidrealm is selected in the top left dropdown), select the Keys tab and the Add providers sub-tab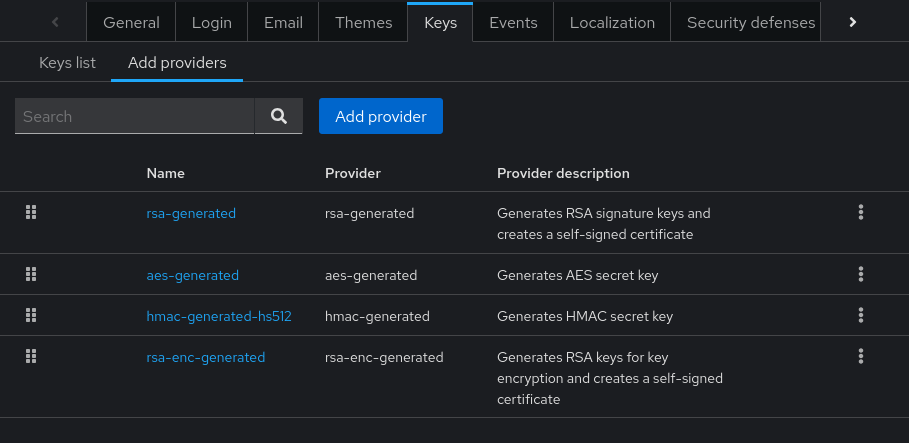
-
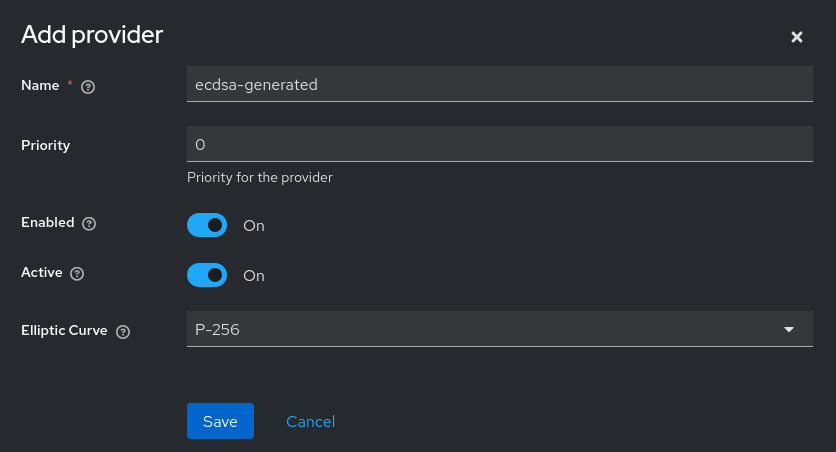
The key list should look like on the screenshot above, with only HMAC and RSA providers. Press Add provider and select ecdsa-generated from the list (from a cryptographic point of view, eddsa-generated would also be ok, but eddsa curves are not supported by all JWT implementations yet).

-
Choose the elliptic curve you wish to use (the default “P-256” is perfectly acceptable) and press Save. Now in the Keys list sub-tab, you should have something like this:

3. Enable unmanaged attributes and set proper attributes permissions
Newer versions of Keycloak no longer allow viewing custom user attributes by default. Enabling Unmanaged Attributes allows viewing them in the Keycloak Administration Console. Also, some attributes are marked as required and could lead to the user having to enter them after their first login.
-
Open the Realm Settings page from the left menu (make sure the
olvidrealm is selected at the top left), select the General tab -
Scroll down to Managed Attributes and select Enabled from the dropdown and press Save at the bottom

-
Still on the Realm Settings page, open the User profile tab and the Attributes sub-tab.
-
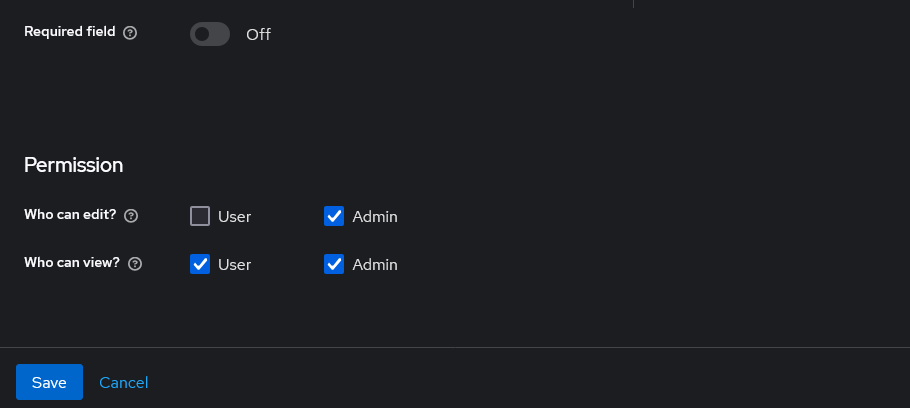
Repeat for each of the email, firstName and lastName attributes:
- Click on the attribute name in blue to open its settings
- Toggle the Required field switch to Off
- Uncheck the Who can edit? checkbox for User (this prevents users from being able to change their name)
- Press Save at the bottom
Disable profile verification
-
Open the Authentication page from the left menu (make sure the
olvidrealm is selected at the top left), select the Required actoios tab -
Scroll down to Verify Profile and make sure it is set to Off (disabled). This option can cause issue when a BOT authenticates with Keycloak.

4. Create the olvid_cl client
A “client” for Keycloak is an entity that can request Keycloak to authenticate a user. In our case, we must create a client in the olvid realm for the Olvid application to authenticate users.
By default, a newly created realm contains several pre-configured clients. These clients allow users to, for example, change their details and password. Depending on the authentication method you choose for Olvid, you may deactivate these clients as they are not used by Olvid for authentication. Be careful, configure this in the olvid realm, not in master. Otherwise, you risk not being able to authenticate with the Keycloak admin console anymore.
-
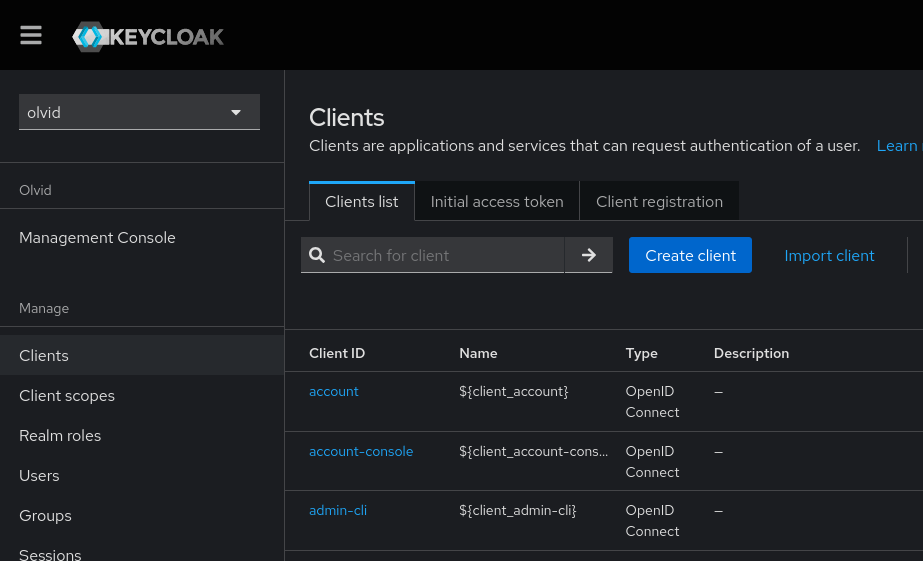
Open the Clients page from the left menu and select the Clients list tab.
-
Press Create client and fill in
olvid_clas the Cliend ID (again, this will be used in URL, so avoid spaces dans special/accented characters). Make sure “OpenID Connect” is selected for Client type and press Next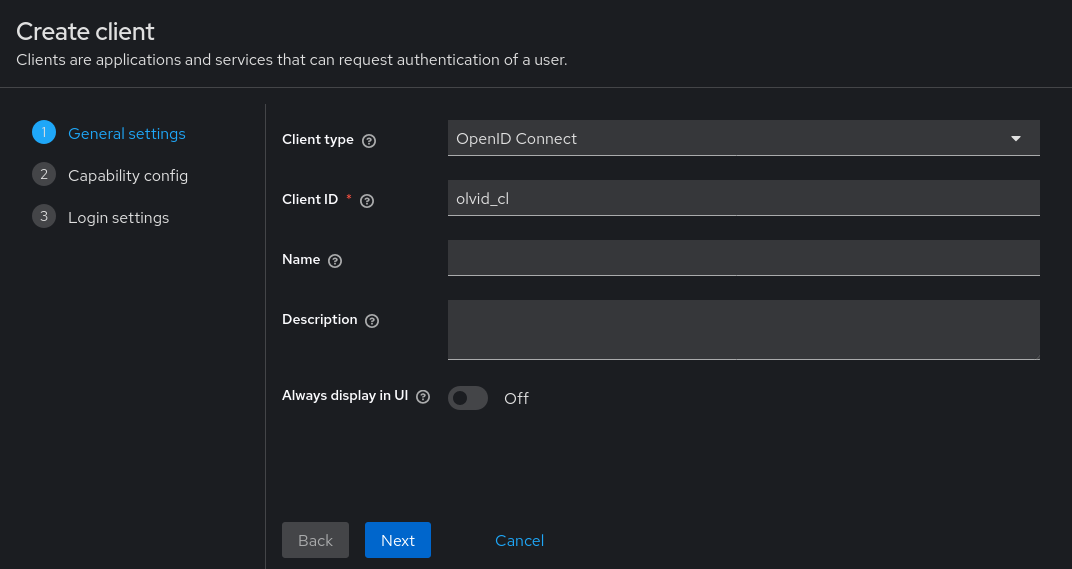
-
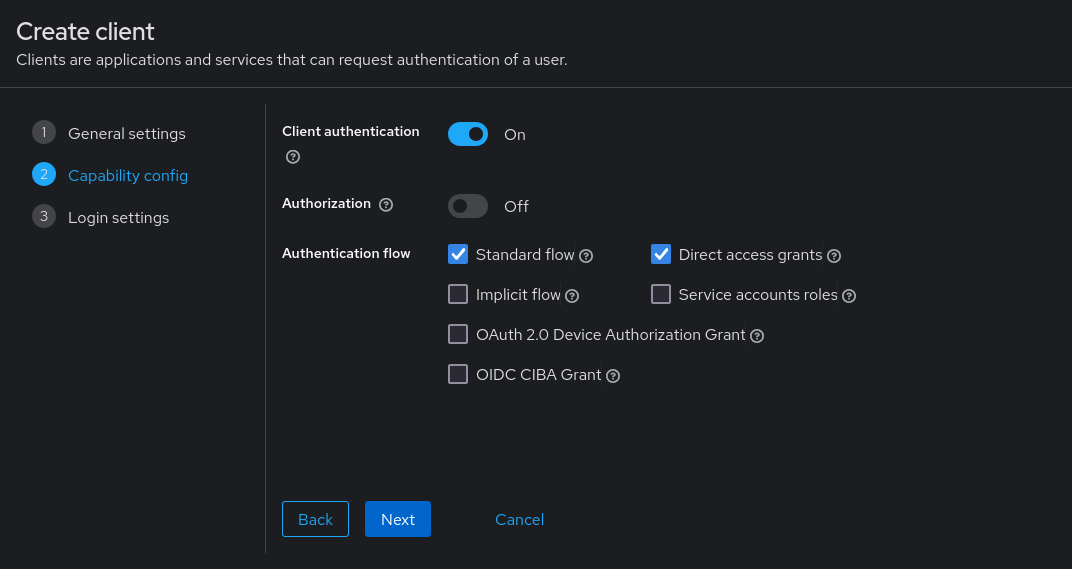
Enable Client authentication (this will add a “client secret” as a shared secret between Keycloak and the Olvid clients), leave Standard flow checked, select S256 for the PKCE Method, and press Next
-
For the Valid redirect URIs enter
https://openid-redirect.olvid.io/(this is the redirection url used by Olvid after authentication). Be careful, the / at the end of this url is mandatory for the authentication to work.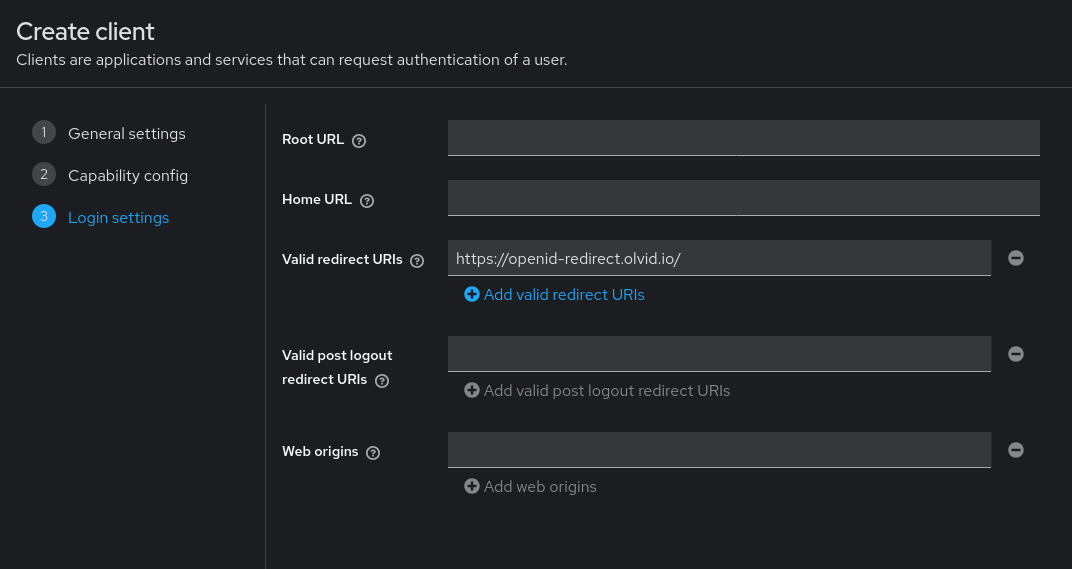
-
Press Save to create the client. No need to change any of the other client options.
5. Disable account and account-console clients
Out of the box, Keycloak allows users to edit their name and email address, reset their password, etc. This is something you probably do not want in your organisation! To make sure this does not happen, you can simply disable the Keycloak “Account” pages.
-
Open the Clients page from the left menu and select the Clients list tab.

-
For both the
accountand theaccount-consoleclients, click the link in the clients table and from the Settings page, press the Enabled switch at the top to disable this client and confirm you want to disable it.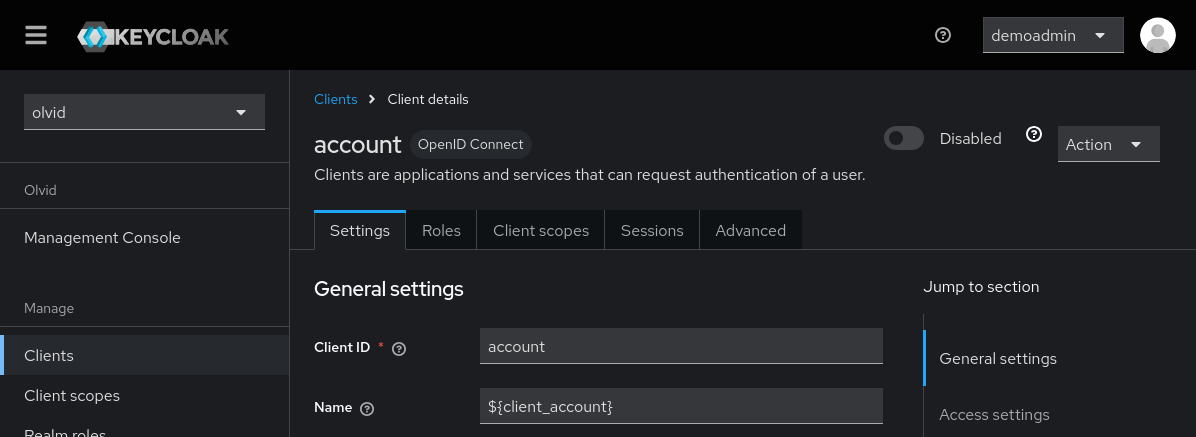
6. Configure users sessions
Enable “offline sessions”
By default, Keycloak uses short-lived sessions that are suitable for a website authentication. In the case Olvid, you probably do not want your users to be requested to authenticate too often, especially as their Olvid application will need to connect to the Keycloak server in the background, without user interaction.
This use case is covered by what is referred to as offline sessions, that is, sessions with a long lifespan, especially intended for background access. The Olvid application does not request offline sessions from Keycloak when authenticating (as some organisations may prefer to have regular short-lived session), so they must be enabled by default on the Keycloak side.
-
Open the Clients page from the left menu and select the Clients list tab. Open the
olvid_clclient and select the Clients scopes tab and Setup sub-tab.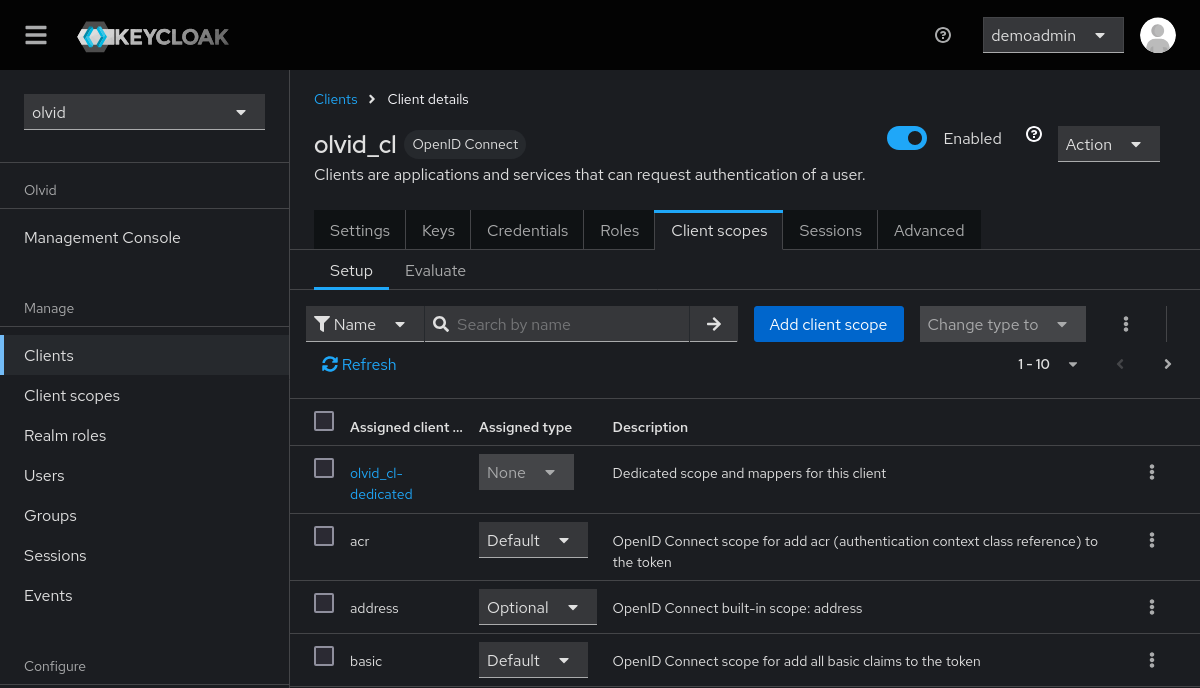
-
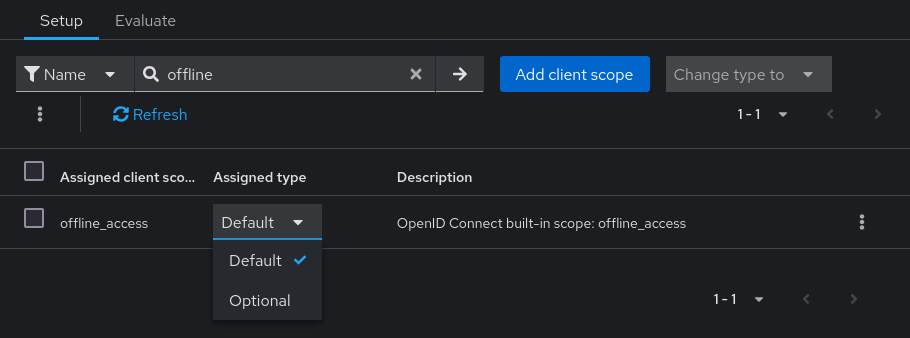
Search for “offline” and change the Assigned type from “Optional” to Default in the dropdown.
Configure the lifespan of sessions
A Keycloak session is mostly composed of two tokens:
- an access token which actually grants access to the service and usually has a short lifespan
- a refresh token with a longer lifespan, that can be used to refresh the access token if it expired.
The lifespan of access tokens is not very important, but the validity of the refresh token will directly impact the users and how often Olvid will prompt them to authenticate.
The lifespan of the refresh token is controlled by two parameters:
- a maximum lifespan which is the maximum lifespan of a refresh token. If set to one month, users will be prompted to authenticate every month.
- an idle lifespan which is the maximum acceptable period of time between two uses of the refresh token. If set to 7 days and a device remains offline for longer than this (say, a user is on vacation for two weeks), the user will be prompted to authenticate when their device comes back online, whatever the maximum lifespan of the token.
Choose the two values you want to select for these lifespans depending on your organisation’s security policy and on the “tolerance” of your users to being requested to authenticate 😁. When their session expires, users will be prompted to authenticate everytime the Olvid application is started until they complete the authentication process. If users get the impression that they always need to authenticate, they might be inclined to systematically cancel the authentication so they can use Olvid instantly. If they do so, users
- they will not be able to update the revocation list pushed by Keycloak,
- they will not have access to updated Keycloak-managed discussion groups,
- after some time, the signature of their profile will expire and other users in the organisation will see them as not belonging to the organisation anymore.
The choice of these lifespans may have to be discussed with the different stakeholders. We recommend a maximum lifespan of 1 month of more and an idle lifespan of 7 days or more. Keep in mind that, at any time, an administrator can decide to end a user’s session: they will then have to re-authenticate immediately.
Note that in a multi-device setup, where users have Olvid on both their smartphone and their computer, they will be requested to authenticate independently on each device: Keycloak sessions are not shared between Olvid devices.
-
Open the Realms settings page from the left menu (make sure the
olvidrealm is selected), and select the Sessions tab (you may need to scroll right in the tabs using the > button)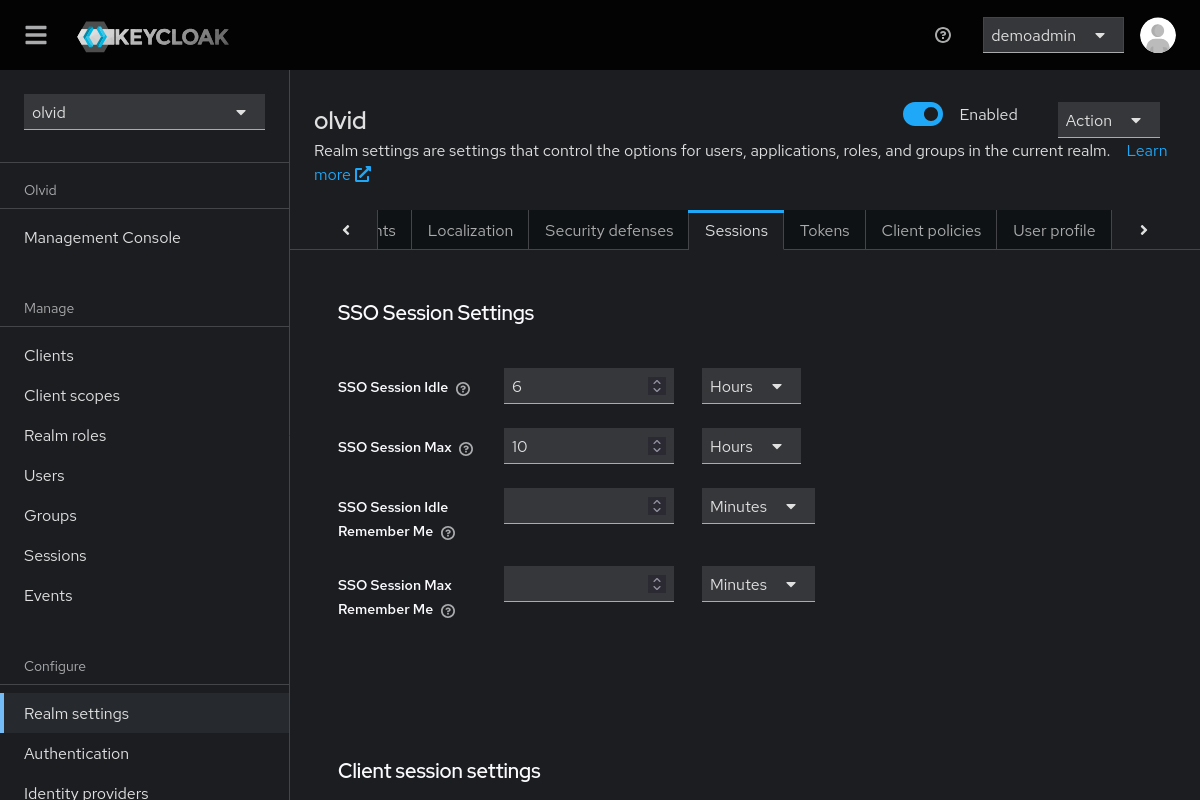
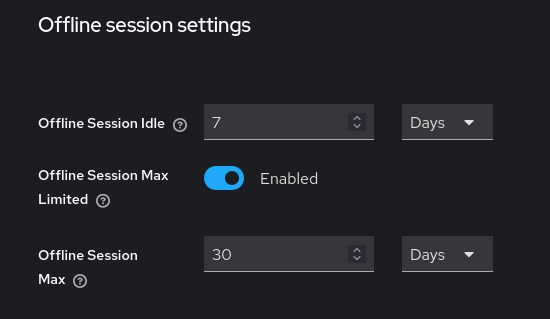
- Scroll down to reach the Offline session settings:
- enter the desired value for Offline Session Idle
- unless you do not want your sessions to expire (meaning users are never requested to re-authenticate), Enable the Offline Session Max Limited switch and enter the desired value for Offline Session Max
-
Scroll all the way down to press the Save button
-
Now we also want our tokens to use the elliptic curves key we generated in Step 2 instead of RSA keys. Open the Tokens tab at the top and select the Default Signature Algorithm to match the ecdsa key you picked: ES256 for P-256. Do not forget to press Save all the way at the bottom of the page.

7. Add a first test user
Users may be created directly from the Olvid Management Console, but for simplicity, start by creating a test user using the Keycloak administration interface.
-
Open the Users page from the left menu (make sure the
olvidrealm is selected), and press Create new user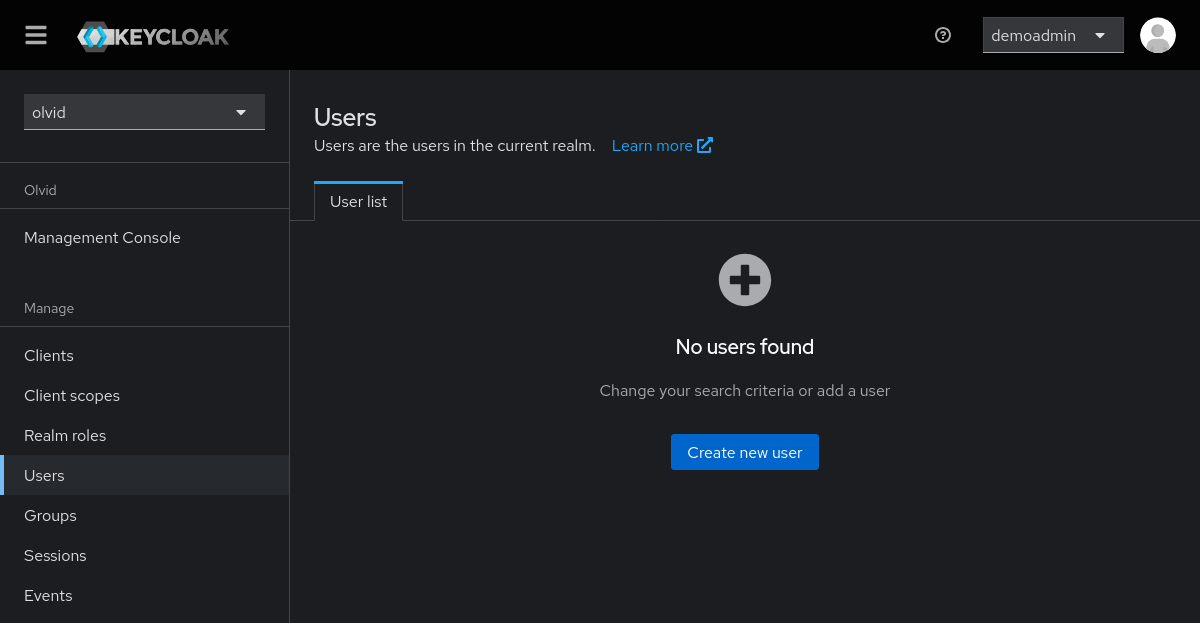
-
The only fields used by Olvid are the Username (for authentication), the First name and Last name (displayed to contacts in the Olvid app). The Email field may be used to send their temporary password to users if you decide to do so.
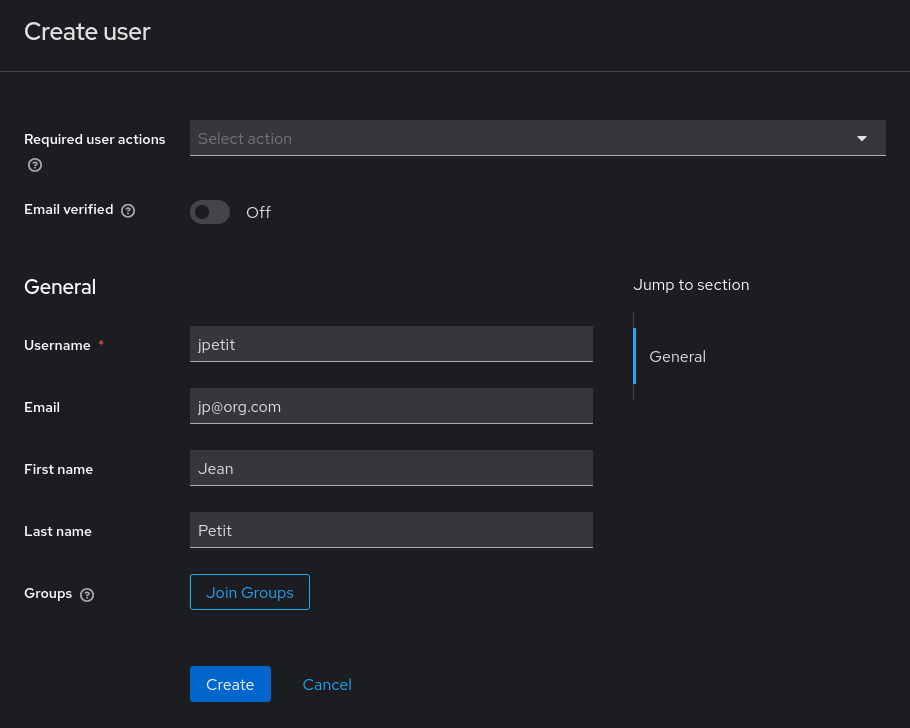
-
Press Create to insert user
jpetitin the database. It is possible to add a Position and Company (also part of the details shown to a user’s contacts) by adding user attributesolvid-positionandolvid-company. -
To create a temporary password for
jpetit, select the Credentials tab, press Set password, enter the password twice and confirm the creation of the password.
-
Go back to the Details tab, you should now see Update Password in the Required user actions
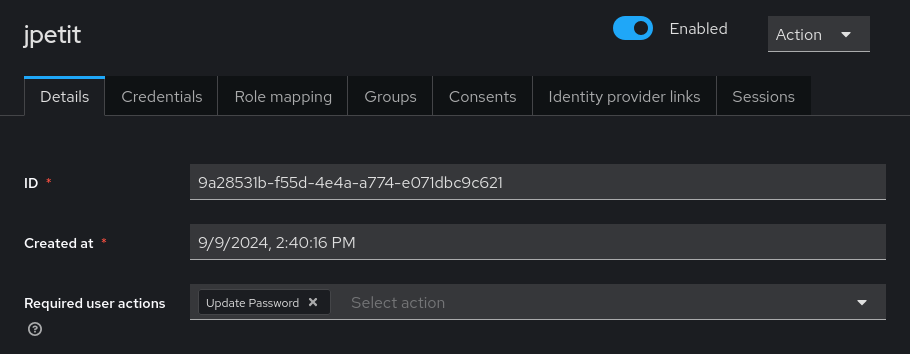
8. Configure security settings
As for the master realm, you may want to activate some Keycloak security settings for the olvid realm. Please refer to the master realm security settings.
9. Configure the Login theme
In order for users to see a recognizable login screen with an Olvid logo, a specific login theme must be selected.
-
Open the Realm settings page from the left menu and select the Themes tab.
-
Select olvid for the Login theme and press Save at the bottom.
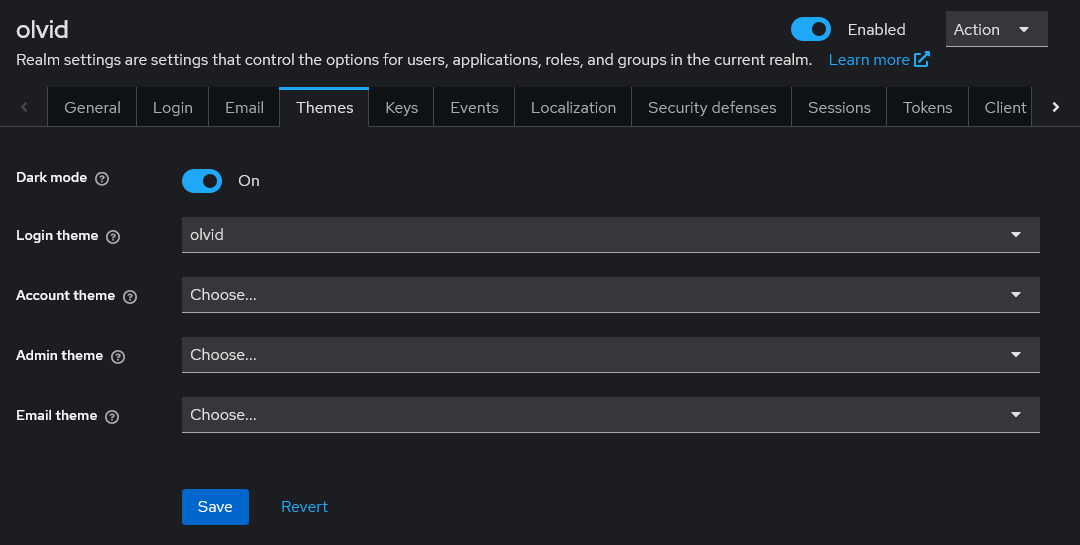
-
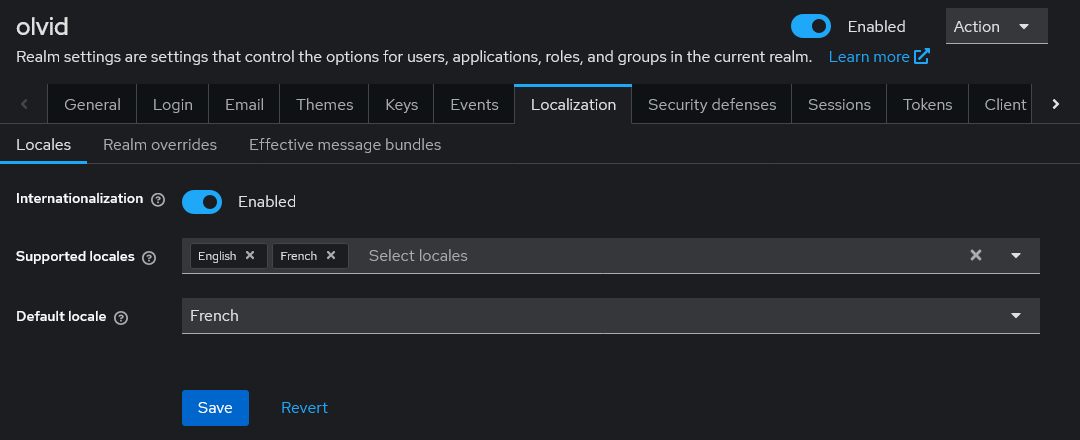
If you want your users to see the login prompt in another language than English open the Localization tab, chose your Supported locales and Default locale, and press Save at the bottom.
